Ever needed to create a Resuscitative Hysterotomy Manikin using (mostly) household objects? GNAAS doctor Dan Bearn has and explains his method here…
Every year as faculty for the Great North Air Ambulance Service’s (GNAAS) Pre-Hospital Emergency Medicine Crew Course (PHEMCC), we sit down and try to see if we can improve the fidelity of our course. 2019 has been a very successful course, with (as every year) our pièce de résistance, a simulated road collision on the penultimate evening of this two week extravaganza of pre-hospital care. This year we had thoracotomies, amputations, pre-hospital anaesthesia and a resuscitative hysterotomy.
Of course the aim of the evening is not to see how many gruesome simulations and surgical procedures we can fit into one twilight hour, but to put the candidates under stress, through challenging logistics, noise, environment and high pressure emotive scenarios to test their bandwidth. We are not trying to glamorise what is a truly horrific situation for the patient, family and pre-hospital team to be in. Our hope is if they are ever in one of these unfortunate scenarios for real (of which a number of the GNAAS team have been) they can lean on this experience to give the patient the best chance of survival.
So other than to show off our AMAZING course, the reason for writing this blog is that the video of our simulated resuscitative hysterotomy has been very popular on social media and people have been asking how they could recreate it. It would be wrong of me to say that I plucked the idea out of thin air. The inspiration came from Sydney HEMS’ blog on how to make an escheratomy manikin using a yoga mat and duct tape to create the layers you have to cut through. Even we were surprised how well it went.
The kit required:
From left to right – body buff sponge, large watertight plastic bag, two pots of blackcurrant jelly, your child’s favourite doll, red food colouring, string, pink or red duct tape.
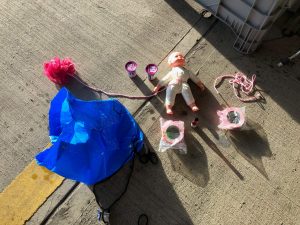
You also require a pink Yoga/exercise mat ,cable tie (or more string) and small clear bag.
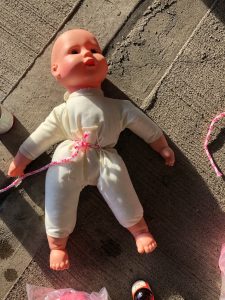
Step 1: Create the foetus, umbilical cord and placenta
Tie rope around the body buff sponge at one end and the doll at the other end.
Step 2: Create the uterus
Fill the plastic bag half full with water, add the food colouring, the ‘foetus’, ‘umbilical cord’ and ‘placenta’. Tie the top of the bag tight with cable tie (or string) leaving a little bit of plastic free at the top to fold over and cover with duct tape to try and make sure it is as water tight as possible. Then wrap duct tape round the bag and you have your uterus:
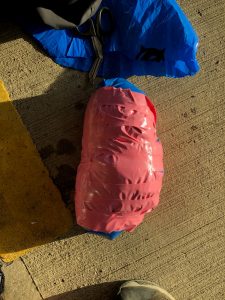
Step 3: Create clotted blood for your initial incision
We actually did this by accident, as we bought the jam as clotted blood and forgot to put it inside the uterus. So we placed the jam in a small clear bag, and taped it to the front on the uterus and then wrapped in more tape so all the plastic bag was covered.
This worked really well to create a bloody field after the initial incision.
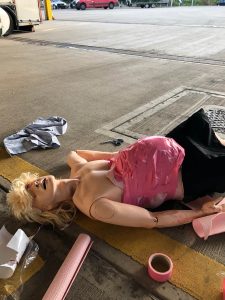
Step 4: Attach uterus to manikin
If you want to protect your manikin, wrap some of your pink yoga mat around it. Then place the uterus on top of the yoga mat. Use a couple of pieces of duct tape to keep the uterus in place. Then cover the uterus with more of the yoga mat (this creates a first layer for candidates to cut through). Trim this to make it look as realistic as possible, then use more duct tape to secure the yoga mat/fake uterus to the manikin. Cover with clothes and tidy the edges with tape and trimming with scissors to make it as realistic as you can.
Step 5: Create a fully immersive simulation to insert your manikin
See it in action:
Share

